| Product Attributes | Last Update: 13th June, 2005
Article ID: 152 |
- Introduction
- Product Attributes
- Attribute Groups
- Attribute Values
- Products Attributes
Introduction
Attributes give the store owner an additional way to market products. For example, shirts are sold of different sizes and different colors. Sizes and Colors are considered attributes.
Product Attributes
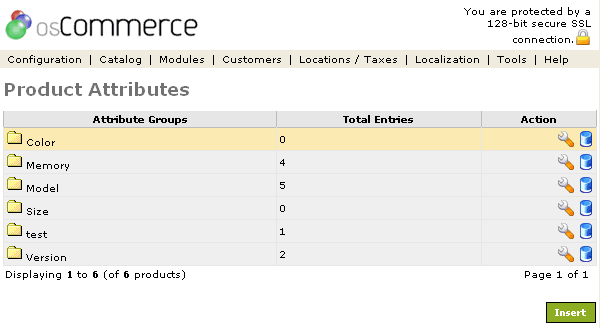
Figure 1 shows the
Categories listing page under the Admin>Catalog>Product Attributes section.

Figure 1. Product Attributes listing page under the Admin>Catalog>Product Attributes section.
To change the details click the "wrench graphic tool" under the "Action" column next to the "Title" being edited. To remove click the blue trashcan.
Product Attributes must be set up individually for each product. They are a great way to offer mutliple options to a customer without needing to create many separate but similar products to choose from. There are also many contributions available that make entry of product attributes in different ways, especially when there are many attributes to add to different products. After an attribute has been set up as described below, it needs to be added to the product in the Catalog>Products listing, under the Attributes tab for that product.
Attribute Groups
All Product Attributes must belong to a group and are listed under the "Attribute Groups" column. Several groups are installed by default, and others can be added by using the "Insert" link below the group listing. Each group must have the text written for each installed language.
Attribute Values
To add an attribute value to a group, click on the group's name in the Attribute Groups listing column. Then, click the "Insert" button to add the value. After the text has been entered to show how that attribute should display for each language, it will be associated with that group. Do this for each item that you will add to the group.
Products Attributes
Now, you are ready to start adding Attribute Groups and Attribute Values to your products.
Finally, select the product from the Catalog>Products menu in the Administrative Tool. Edit the product, and go to the "Attributes" tab. Here, all available attributes will be listed, and can then be associated with the product by using the >> button in the middle. Once added, a price modifier can be added to the attribute so that the product price will be affected if that attribute is chosen. If the price stays the same on each attribute then leave this box blank. If the price goes up or down on each attribute then put an amount from the product "base price" and put a "plus" or "minus" sign in the next box. To remove the attribute, use the - button listed to the right of the attribute.
For Example:
size = medium = 10.00 (this is the regular price of the product so no need to put a price in the "price box".
size = small = 8.00 (put 2.00 - (this is $2 with a "minus" sign from the base price of the product price of $10.00)
size = large = 12.00 (put 2.00 + (this is $2 with a "plus" sign from the base price of the product price of $10.00)
