| Payment | Last Update: 13th June, 2005
Article ID: 233 |
- Introduction
- Payment Modules
- Sort Order (Display Order)
- Status Checkbox
- Terms
Introduction
Payment Modules give the store owner a way to interface with several established companies for credit card processing, as well as a few methods that simply store information on the local server for off-line processing. There are also modules available for handling cash, money order, and check payments, which do not involve an external merchant.
In addition to the default modules that come with osCommerce, there are many
additions available in the community contributions for other merchant vendors.
Payment Modules
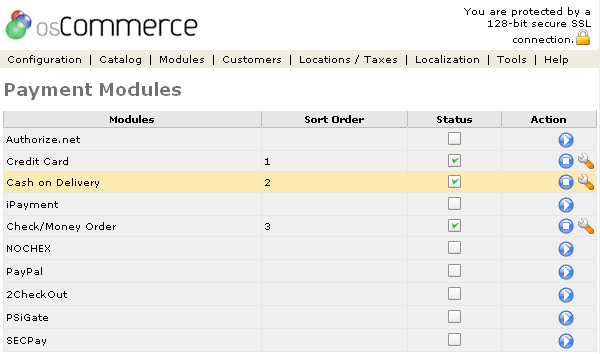
Figure 1 shows the
Payment Modules listing page under the Admin>Modules>Payment Modules section.

Figure 1. Payment Modules listing page under the Admin>Modules>Payment Modules section.
To install a shipping module click on the play icon in the Action column and to change the details click the "wrench graphic tool" under the "Action" column next to the "Title" being edited. To remove click on the stop icon in the Action column.
The payment modules come with many modules built into the code, although not all are installed initially. Installing a module can be done by clicking on the play icon in the Action column, and editing can be done by clicking on the wrench icon. A module can only have its settings edited after it has been installed.
If other payment modules are placed in the code from the community contributions site, they will need to be installed in the same manner as the ones listed above before use.
Sort Order (Display Order)
The sort order field associated with each module describes in what order the modules will be presented to the customer during checkout. The modules will always be displayed in alphabetical order in the Administrative tool, regardless of the Sort Order field. Changing the Sort Order can be done by editing the settings for that particular module, but cannot be done at the main payment modules screen. The sorting is done with the lowest number representing the top of the displayed list, except for modules with a value of 0, which are put at the bottom. Ties are sorted alphabetically.
Status Checkbox
Once a payment module has been installed, whether or not it is displayed to the customer depends on the value from the checkbox. This box is changed by editing the module's settings. Checking the box allows the customer to use that option for payment, while unchecking the box removes it from the customer's view. This is different from removing the module altogether with the stop icon, as it preserves the module's settings, in case it is later re-enabled. A module cannot be made active until it has been installed.
Terms
- Installing a Module
Installing a module makes it usable by the system. This is done by clicking the play icon in the Action column on the main payment modules page. The code has already been put with the rest of the osCommerce store's code.
- Active
After a module has been installed, whether or not it is displayed to the customer is controlled by the Status checkbox. A module cannot be made active before it is installed. This setting is changed by editing the settings for that module.
